When sending in parts for electropolishing, it is crucial for the parts to be correctly prepared for the process. Since electropolishing is typically the last step in the manufacturing process, proper preparation of parts is crucial for optimal results.
To prepare parts for electropolishing, take these steps:
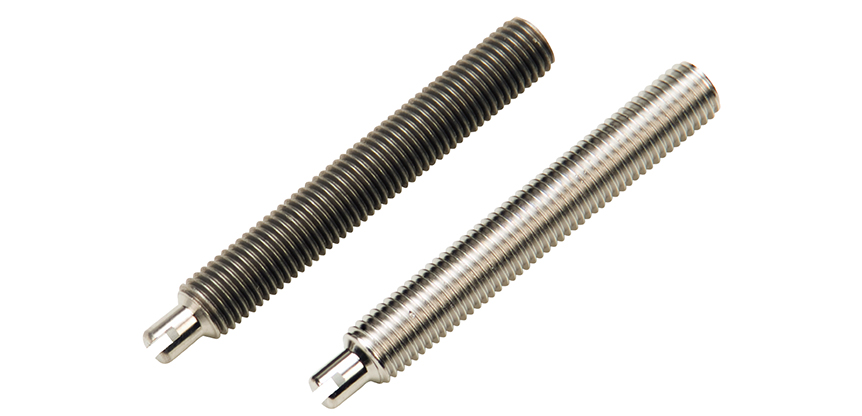
1. Remove Surface Scratches
Electropolishing will highlight, rather than remove scratches and machine lines. The general rule of thumb is if you can feel the scratch or machining defect with your thumbnail, electropolishing will not remove it. Electropolishing removes only a very thin surface layer, and deeper scratches remain visible if not removed prior to the process. For a smooth, high-shine surface finish, machining lines and deeper scratches should be removed by mechanical polishing or other means prior to electropolishing.
2. Remove Macro Burrs
Large burrs should be removed with finishing methods such as vibratory finishing or tumbling. In some cases, it is not the height of the burrs, but the width of burrs, that determines whether they will be totally removed with electropolishing. We suggest submitting samples to confirm effectiveness prior to sending production lots.
3. Remove Traces of Soap Lubricants
Prior to submitting a part for electropolishing, if you have used soap-based lubricants, remove all traces of the product, or notify your electropolisher prior to submitting parts. Soap products contain silicates that cling to the metal, and if not removed can lead to resist patterns (unpolished areas) or stains in the finished part.
4. Remove Adhesives and Coatings
Certain types of prefinished stainless steel are purchased with vinyl coatings that are adhered with a clear adhesive. After peeling off the vinyl these adhesives must be removed prior to electropolishing. The standard pre-cleaning method of vapor degreasing will not remove the adhesive. Alternative pre-cleaning methods are necessary and can be easily implemented if we are aware of the situation. Leaving the adhesive on the parts will cause resist patterns, creating an uneven finish that would need to be removed mechanically.
5. Understand Your Desired Microfinish (Ra) Value
When removing .001” material total (.0005” per surface), electropolishing can reduce the Ra value of a part by up to 50%. For example, a part with an initial Ra value of 16 can be improved to a final Ra value of 8 after electropolishing. Determining your desired, final Ra is important and will dictate how you prepare your part for electropolishing. Lowering the Ra finish may require adding a secondary finishing operation after machining such as grinding or mechanical polishing prior to electropolishing.
6. Ensure Welds Are Airtight & Uniform
All welds must be airtight, with no pinholes where the electrolyte and other fluids could become entrapped. Once entrapped, these fluids can be difficult to remove, and can continue to leech out of the part when in use.
7. Clean from Welds
Prior to electropolishing, remove the excessive black or char from welded areas. Lubricants and oils can be burned into the metal during the welding process, and care is necessary to prevent this condition. Once lubricants and oils are burned into the part it can be difficult to remove, and can affect the quality and appearance of a part after electropolishing.
8. Eliminate Advanced Scale from Heat Treating
For parts that have been heat-treated, advanced scale must be removed before electropolishing. The scale left from heat treating acts as an insulator and reduces overall conductivity, creating unwanted resist patterns on the part. Have all advanced scale from heat-treating fully removed prior to submitting a part for electropolishing for uniform, shiny results.
9. Make Drain Holes on Round or Square Tubing Parts
We recommend adding drain holes on weldments made with butt welded tubing where the ends are covered. Drain holes should be designed into the part and included in part drawings. The drain holes are effective for removing entrapped electrolyte and other liquids from the interior of the part.
10. Ensure Blasted Parts Have a Uniform Surface
To correctly prepare a part that has to undergo blasting, be sure to use uniform pressure to create a uniform impingement depth in the metal. The blasting may look uniform on the surface but after removing the outer skin with electropolishing, “hot and cold spots” will be evident upon completion. . A blasted part with an uneven surface will have bright and dull areas.
11. Choose High Quality Wire for Wire Parts
For springs, racks, and other parts made from stainless steel wire, specify EPQ (electropolishing quality) wire. EPQ wire has a smoother, brighter finish and yields a chrome-like appearance. . Using lower quality wire can result in parts that have a lackluster, frosty finish.
12. Specify 2B Finish on Sheet Metal
For sheet metal components, we recommend specifying a 2B finish to receive a bright, uniform finish after electropolishing. If a mirror-like finish is required, you will need to purchase a bright-annealed material.
For optimal results from electropolishing, consult with an electropolishing specialist at Able Electropolishing today! We are always willing to process samples at no-charge.